Installer NZBGet sur le Raspberry Pi pour télécharger sur Usenet


Pour récupérer vos films de vacances, nous avons déjà vu ruTorrent, Transmission ou encore Deluge. Un autre format utilisé dans les newsgroups est le format NZB.

0020_14587_1372319389_nzbget

  1. Mettre à jour le système
    apt-get update && apt-get -y upgrade
  2. Télécharger et décompresser l’archive
    wget http://sourceforge.net/projects/nzbget/files/nzbget-11.0.tar.gz
    tar zxvf nzbget-11.0.tar.gz
    cd nzbget-11.0
  3. Installer les paquets nécessaires à l’installation
    apt-get install -y g++ libstdc++6 libxml2-dev libncurses5-dev libsigc++-2.0-dev libpar2-0-dev libssl-dev
  4. Lancer la configuration
    ./configure --disable-libpar2-bugfixes-check
  5. Lancer la compilation
    make
  6. Installer
    make install
  7. Générer les fichiers de configuration
    make install-conf
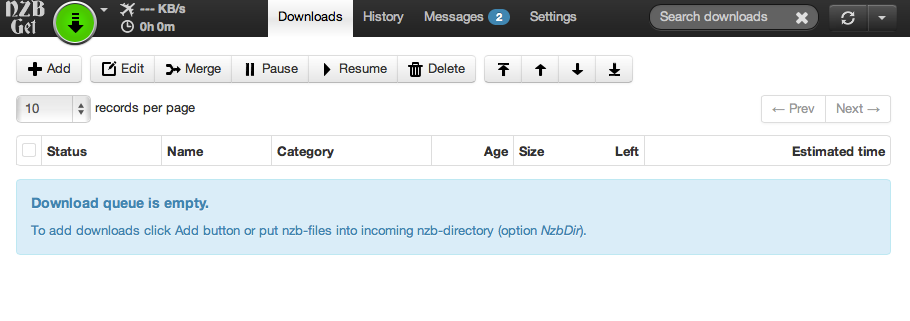
  8. Vous pouvez maintenant accéder à NZBGet avec l’adresse http://<IP de votre Raspberry Pi>:6789
    Le login : nzbget
    Le mot de passe : tegbzn6789
    NZBGet
  9. Vous pouvez configurer l’outil soit depuis l’interface soit dans le fichier /usr/local/etc/nzbget.conf. Pratique pour la gestion des différents répertoires pour vos fichiers NZB où vous voulez sauvegarder les fichiers chargés.
  10. Pour avoir NZBGet en service, vous pouvez utiliser ce script dans /etc/init.d, très simple et classique :
    #!/bin/sh
    ### BEGIN INIT INFO
    # Provides:          NZBget
    # Required-Start:    
    # Required-Stop:     
    # Default-Start:     2 3 4 5
    # Default-Stop:      0 1 6
    # Short-Description: Start NZBget
    # Description:       Start NZBget
    ### END INIT INFO
    case "$1" in
    start)   echo "Start NZBget"
    /usr/local/bin/nzbget -D
    ;;
    stop)   echo "Stop NZBget"
    /usr/local/bin/nzbget -Q
    ;;
    restart)
    $0 stop
    $0 start
    ;;
    *)   echo "Usage: $0 start|stop|restart"
    exit 1
    ;;
    esac
    exit 0

    Pour activer le service lors du démarrage du Raspberry :

    chmod 755 /etc/init.d/nzbget
    update-rc.d nzbget defaults

Si vous voulez décompresser vos archives après téléchargement, vous pouvez installer unrar et 7zip

apt-get install -y unrar p7zip-full

Si vous utilisez Nginx comme serveur web et que vous souhaitez rediriger un site vers NBZGet, voici un exemple de fichier de configuration à mettre dans /etc/nginx/sites-enabled :

server {
	listen   8080;
	root /usr/local/share/nzbget/webui;
	index index.html index.htm;
	error_log /var/log/nginx/nzbget_error.log;
	access_log /var/log/nginx/nzbget_access.log;
	location ~ ^/($|./*) {
    		proxy_pass http://127.0.0.1:6789;
    		proxy_set_header Host $host;
    		proxy_set_header X-Real-IP $remote_addr;
    		proxy_set_header X-Forwarded-For $proxy_add_x_forwarded_for;
  	}
}

Voilà, c’est prêt !

Vous aimerez aussi...

  • Garret

    Hi, I got a Raspberry Pi because I wanted to install NZBget on it. In other tutorials (like http://www.howtogeek.com/162060/how-to-install-nzbget-for-lightweight-usenet-downloading-on-your-raspberry-pi/ ) I have seen that they always patch the libpar2. I can see that you do not do this. Is there a specific reason? Don’t you also need unrar? How do you find NZBget working on the Pi? I mean, is it responsive enough even with the postprocessing scripts?

    • Hi, what i understood of other websites is that the patch is not mandatory that’s why there is an option to install the software and disable the requested patch.
      About unrar i do not install it in this tutorial but you can install it (also 7zip) if you want to uncompress automatically archives after the download.
      Of course you can not expect high performances on the pi in particular when you uncompress archives, the cpu will be at 100% until the end of the operation.
      I don’t use NZB downloads at home and keep on a torrent tool like transmission.

  • astro

    Hello,

    I recommand to modify the init.d script with these 2 lines


    # Required-Start: $all
    # Required-Stop: $all

    ______________________________________________________________________

    (Plus de détails en français)

    merci beaucoup pour ce tuto.
    Cependant une petite correction au niveau du script init.d.

    En effet dans ma configuration (download queue située sur un NAS monté sur le raspi au démarrage), NZBget n’arrive pas à recharger la file d’attente, je suis obligé de le faire manuellement une fois démarré.
    Pour éviter ça, il suffit de modifier les deux lignes suivantes :


    # Required-Start: $all
    # Required-Stop: $all

    ce qui donne donc


    #!/bin/sh
    ### BEGIN INIT INFO
    # Provides: NZBget
    # Required-Start: $all
    # Required-Stop: $all
    # Default-Start: 2 3 4 5
    # Default-Stop: 0 1 6
    # Short-Description: Start NZBget
    # Description: Start NZBget
    ### END INIT INFO
    case "$1" in
    start) echo "Start NZBget"
    /usr/local/bin/nzbget -D
    ;;
    stop) echo "Stop NZBget"
    /usr/local/bin/nzbget -Q
    ;;
    restart)
    $0 stop
    $0 start
    ;;
    *) echo "Usage: $0 start|stop|restart"
    exit 1
    ;;
    esac
    exit 0

    J’ai auparavant essayé avec $network $remote_fs $syslog comme pour le script que j’ai de sickbeard au lieu de $all mais ça ne fonctionne pas. Je ne sais pas ce qui doit pêtre démarré avant, donc par défaut $all est un peu bourrin mais fonctionne très bien :D.

Handpicked links

Mise en cache objet de 2056/2209 objets utilisant disk Mise en cache utilisant disk: enhanced Mise en cache de base de données 9/62 requêtes dans 0.052 secondes utilisant disk Served from: pihomeserver.fr @ 2017-06-19 08:29:47 by W3 Total Cache -->