Test the Vala language / Engineering on Raspberry Pi
Languages are many on Raspberry Pi. Elders like C passing through the modern (Python ?) or heavy like Java, the choice is wide ! New supported The Gnome Project, Genie just settle on our Raspberry.  On the official page Genie you will find the basis for use of this language. But let's start by installing what is for the language :
- Update of the system
apt-get update && apt-get -y upgrade
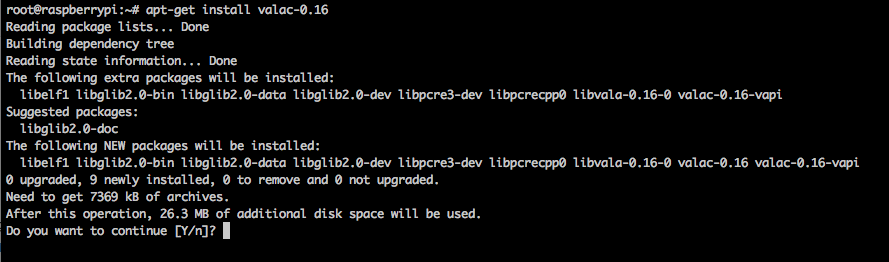
- Install the compiler VALA who supports the engineering language. Will also need you the compiler GCC.
apt-get install gcc valac-0.16

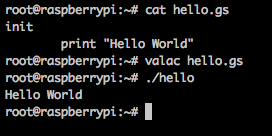
- You can now create your first program : Hello World ! (Lui est vraiment universel 😉 )
init print "Hello World" - You start compiling with the command valac.
- Remains to launch the generated program : hello.
Then everything is nice but what is the point of this language ?
I'll give you the list (partial) its benefits :
- Ease of programming. The code is similar to the Python (with a bit of Boo, Delphi or encode the D). So easy to understand !
- Performance. There where the high-level languages use a process for interpretation (via pre compilation or not), Engineering-generated code is c with excellent performance in execution.
- The possibility of using objects of type GObject. It comes (in the outline) equivalent to objective-C for Apple. Ultra practice to mount a portable graphical interface in a few lines. Only libc and Glib are needed.
- Lightweight executables. The Hello World classic is 2.9 Kb and the same GTK is less than 6 Kb.
- Liaison with libraries systems directly from engineering. Not of overlay like in Python for the binding example.
Well on, all is not rosy and there are drawbacks :
- It is compiled. C’est l’inconvénient des avantages 🙂 Un script python peut être facilement envoyé par email, amended and implemented. Here it is not necessarily so simple (surtout si vous envoyé le code C généré ou que la personne n’a pas Vala d’installé).
- And the last : a community existing but fairly small. Support remains therefore limited during the learning phase. I galley ! 🙂
So here in the (very) large lines that can be said of the language.
I give you further examples :
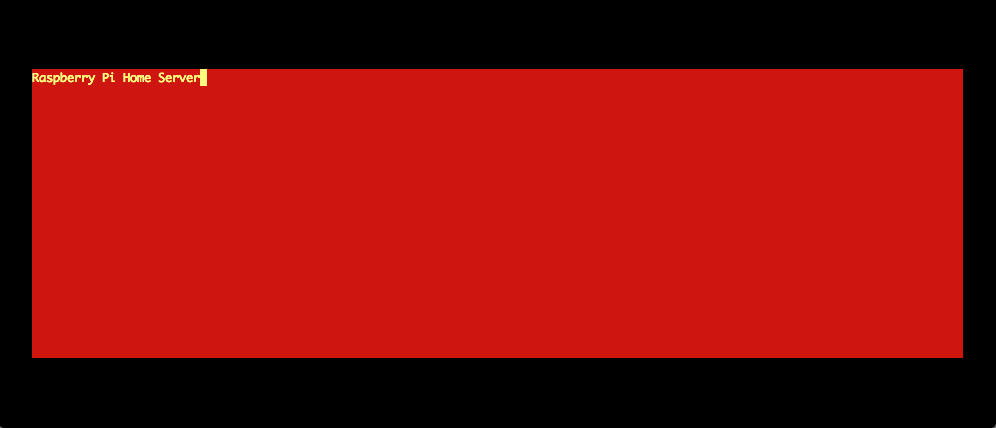
Display a red screen with text from above using the curses library :
[Indent = 8]
uses
        Curses
init
        initscr ()
        start_color ()
        init_pair (1, Color.YELLOW, Color.RED)
        var win = new Window (LINES - 8, COLLARS - 8, 4, 4)
        win.bkgdset (COLOR_PAIR (1) | Attribute.BOLD);
        win.addstr ("Raspberry Pi Home Server");
        win.Refresh();
        win.clrtobot ();
        win.getch ();
        endwin ()
To compile (If your file is named test.GS) :
valac - pkg curses x - lncurses test.gs
The result :
With GTK installed, You can create windows quickly :
[Indent = 4]
uses
    Gtk
init
    Gtk.init (REF args)
    var wintest = new win_test()
    wintest.show_all ()
    Gtk.main ()
class win_test : Window
    init
        title = "Raspberry Pi Home Server"
        default_height = 250
        default_width = 250
        window_position = WindowPosition.CENTER
        var button = new Button.with_label ("Press here")
        button.clicked.connect (pushed)
        destroy.connect(Gtk.main_quit)
        add(button)
    definitely pushed (btn : Button)
        title = "You clicked it"
        btn.label = "You pressed me !"
La compilation avec GTK 3 installed :
valac--pkg gtk -3.0 gtk.gs
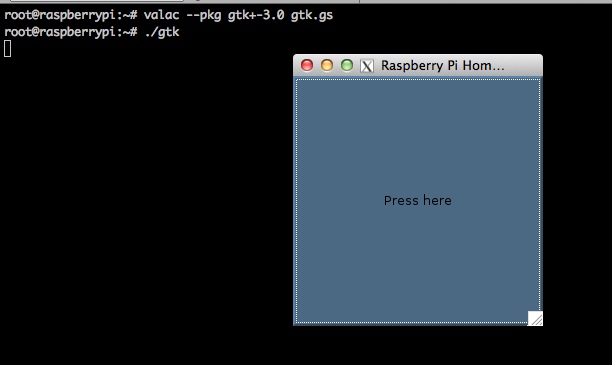
Simple, fast and efficient !
Bon et pour notre Raspberry Pi ? It's almost easy. But I well paved the way ! 🙂
- Install the C wiringPi library. Le tutoriel est sur the official page.
- CRera a link (the binding) between wiringPi and Vala/engineering. For that you create the file /usr/share/vala-0.16/VAPI/wiringPi.vapi with the following content :
[CCode (cheader_filename = "wiringPi.h")]
public const int NUM_PINS;
[CCode (cheader_filename = "wiringPi.h")]
public const int INPUT;
[CCode (cheader_filename = "wiringPi.h")]
public const int OUTPUT;
[CCode (cheader_filename = "wiringPi.h")]
public const int PWM_OUTPUT;
[CCode (cheader_filename = "wiringPi.h")]
public const int GPIO_CLOCK;
[CCode (cheader_filename = "wiringPi.h")]
public const int LOW;
[CCode (cheader_filename = "wiringPi.h")]
public const int HIGH;
[CCode (cheader_filename = "wiringPi.h")]
public const int PUD_OFF;
[CCode (cheader_filename = "wiringPi.h")]
public const int PUD_DOWN;
[CCode (cheader_filename = "wiringPi.h")]
public const int PUD_UP;
[CCode (cheader_filename = "wiringPi.h")]
public const int PWM_MODE_MS;
[CCode (cheader_filename = "wiringPi.h")]
public const int PWM_MODE_BAL;
[CCode (cheader_filename = "wiringPi.h")]
public const int INT_EDGE_SETUP;
[CCode (cheader_filename = "wiringPi.h")]
public const int INT_EDGE_FALLING;
[CCode (cheader_filename = "wiringPi.h")]
public const int INT_EDGE_RISING;
[CCode (cheader_filename = "wiringPi.h")]
public const int INT_EDGE_BOTH;
[CCode (cname = "int", cprefix = "WPI_", has_type_id = false)]
[Flags]
public enum Foo {
    FATAL,
    ALMOST
}
[CCode (cname = "wiringPiSetup")]
public int wiringPiSetup ();
[CCode (cname = "pinMode")]
public void pinMode (int pin, int mode);
[CCode (cname = "digitalRead")]
public int digitalRead (int pin);
[CCode (cname = "digitalWrite")]
public void digitalWrite (int pin, int value);
[CCode (cname = "piBoardRev")]
public int piBoardRev ();
namespace wiringPi {
	[CCode (cname = "int", cprefix = "WPI_MODE_", has_type_id = false)]
	public enum WpiMode {
   		PINE,
    	GPIO,
    	GPIO_SYS,
    	PHYS,
    	PIFACE,
    	UNINITIALISED
	}
}
This file includes part of the definitions made in the C library. I did everything but the principle is there ! You can make the setup and change the position of a GPIO.
- Is the program which is flashing an LED connected to the GPIO 17. Je l’ai nommé genius_test.gs
uses
	wiringPi
init
	stdout.printf ("Raspberry Pi Board revision : %d\n", piBoardRev());
	wiringPiSetup();
	pinMode (0, OUTPUT) ;
	for var i = 0 to 6
		digitalWrite (0, HIGH);
		Thread.usleep (500*1000);
		digitalWrite (0, LOW);
		Thread.usleep (500*1000);
- Et enfin la compilation !
valac --pkg wiringPi -X -lwiringPi genie_test.gs ; ./genie_test
You this is so with a LED which flashes through a program that is less than 6 kb and without having to go through the more complex coding of C. You can integrate it easily into a GTK interface for example.
You can play now ! 🙂


