Feed Raspberry Pi with AA batteries

Warning : This article has been automatically translated by Bing Translate


Danger : This article has been automatically translated by Bing Translate


Caveat : This article has been automatically translated by Bing Translate

Raspberry Pi is a resourceful device, Lightweight and can easily be integrated into a draft electronic and mobile. It then becomes interesting to power it on something other than an electrical outlet.

Raspberry Pi Home Server - Alimenter le Raspberry avec des piles

For those seeking information on the Raspberry ft power cord other than the USB, You can find many speaking blogs of the subject. An excellent article in French here and any other as well in French here.

Using battery Lipo tempted me good but seemed a little less convenient than go through AA standard batteries.

The time here is what I put in place :

Raspberry Pi Home Server - Alimenter le Raspberry avec des piles

The batteries are Ni-MH conventional batteries, 4 are the 1.2V - 2300mAh and 2 are the 1.2V - 2100mAh.

In addition to these batteries, you are going to need very little material :

  • A housing 6 batteries (here)
  • A limiter of voltage LM2596 you can find here
  • A voltmeter/ammeter
  • A flat screwdriver
  • A micro USB connector (optional we will see why after). Home I cut the wire of a loader to retrieve the socket.

Here is the material image

Raspberry Pi Home Server - Alimenter le Raspberry avec des piles AAYes it lacks the USB cable (He didn't want to be in the picture !)

The principle of the LM2596 is simple (that's surely why I managed assembly !), It takes as input a voltage of 4V to 35V (continuous) and will regulate the output between 1.23V and 30V. The output voltage must be at least 1V below input voltage. Hence the need of 6 batteries not 4, otherwise very quickly the Raspberry may also turn off.

For Assembly, It's simple, the Red wire of the battery box on the IN the LM2596, the black wire on the IN-. Install the batteries and use the voltmeter to measure the voltage input :

WP_20131031_007

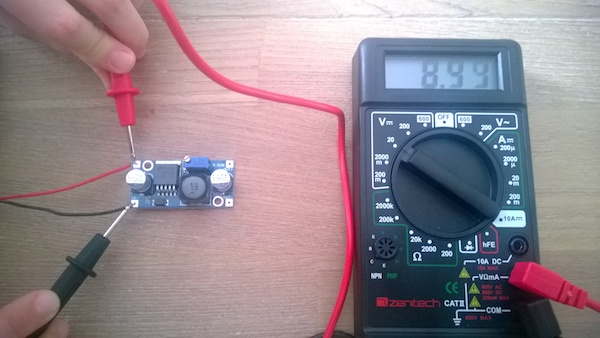
8.99V for 6 1.2V batteries …. I understand too much but at least it's not zero !

Next step : adjust the output voltage. It is the little screw on the blue block. You screw to reach the 5V

WP_20131031_008
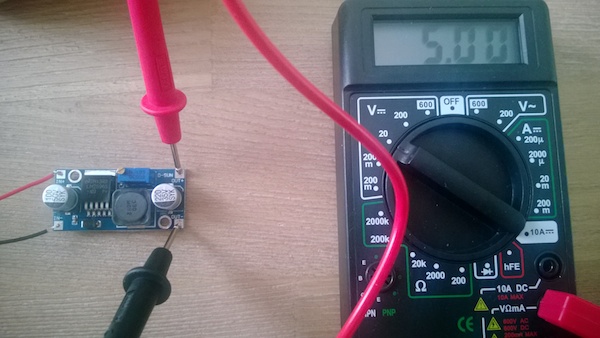
It is perfect it is the desired tension !

Rest to add to our mounting the microphone USB socket.

Raspberry Pi Home Server - Alimenter le Raspberry avec des piles AA

I could connect directly to the GPIO ports (in 5V) but in this case, It is not the protection fuse and as I am no expert I did not take risk !

The final cut is so I find pretty basic :

Raspberry Pi Home Server - Alimenter le Raspberry avec des piles AA

Regarding the autonomy, by putting a script at boot adding all the 20 seconds at the end of a file, time system has managed to keep a little more of 12 hours. I didn't know if my batteries were loaded to the maximum.

#! /usr/bin/python import time if __name__ == == "__main__":
    myfile = open("/testup.txt","w")
    nowTime = time.strftime("%Y/%m/%d-%H:%M:%S")
    myfile.write(nowTime 'n')
    myfile = open("/testup.txt","a")
    While True:
        nowTime = time.strftime("%Y/%m/%d-%H:%M:%S")
        myfile = open("/testup.txt","a")
        myfile.write(nowTime 'n')
        myfile.close()
        time.sleep(20)

Next step, recharge the batteries but test with type temperature sensors, distance or LEDs. And go search for techniques to save energy.

So, I think that for less than €5 you can easily have a montage to make your precious mobile for your projects.

You may also like...

  • Hello,

    encore un bon tuto 🙂

    Note that you use a step down regulator, but there are also sound during step up the LM2577
    Which conversely, increases the voltage. It can be very handy for use with little batteries on shortly (a demo for example).

    If not for the duration, you use 6 2100mA/h batteries (even if you have a 2300 in the batch),
    2100 * 6 = 12600 mA / h
    In theory, If the Pi is Raspberry not big thing it will consume 700mA
    What gives a lifetime of 18 h
    If we consider that it is closest to 1A, the time it takes 12 h.

    Note that what will mostly play on life it is the amperage. If it drops below the 500mA, There are good chances that Raspberry Pi suffers and eventually shut down.
    And in general, the battery charge end sees their amperage collapse quickly.

    • Thanks for these excellent details as usual ! 🙂 J’ai du mal avec la théorie en électricité. It must be that I am a good charger to make sure that the batteries are fully charged up.

      For the voltage booster, I got mine at the same time as step down. Ca va faire l’objet d’un prochain tuto 🙂

    • Alain

      Bonjour Yaug,
      Les batteries sont ici en série : on additionne donc les tensions et non les intensités.
      Un raspberry Pi (en tout cas les premières versions) consomment entre 100 et 200mA (CF http://raspi.tv/2016/how-much-power-does-raspberry-pi3b-use-how-fast-is-it-compared-to-pi2b) suivant l’usage qui en est fait. Si on prendre 170 mA en moyenneon obtient les 12h mentionnés ci dessous.

  • Mark Swope

    Very nice, clean job. Your explanation is very good and the results are pleasing.
    You may consider using a Model A Raspberry PI in order to reduce the battery demand - assuming, of course, that you don’t need the on-board ethernet, added memory and second USB port.
    Good job!

    • Thank you. That's right. I saw in many posts that the model A seems to use less power than the B so i think i will invest in the first model to implement my next project !

  • RC

    To get significantly longer battery time use D-cells 4x… Lithium D can push 12000mAh.

    • Thanks. Do you also get two wires to plug in the stepper down or do you need a specific adaptator ?

  • Raspberrypi_fr

    Nice initiative,

    You could even refrain from cutting off a microUSb plug.
    Why not use the GPIO plugs directly to power the board.
    http://www.cl.cam.ac.uk/projects/raspberrypi/tutorials/turing-machine/pi_gpio.jpg
    (NA not use this fact use food µUSB)

    good continuation
    @RaspberryPi_Fr

    • Hello,
      As I said in the article, I didn't want to go through the GPIO to not spend to dimension the fuse. I do not know the effects that can have the battery when the voltage falls below the 5V. So I stayed on a surely less effective technique but I think a little more secure
      To the microUSB cable I put a domino to reused me in case where

  • Excellent tutorial !

    For the 5v simply you can also a LM7805 regulator which provide stably the 5V. Il faudra juste penser à mettre un petit radiateur sur le composant pour ne pas qu’il crame trop rapidement 😀

    • GPA

      …. au prix d’une perte d’autonomie de près de 40%

      La solution avec un module LM2596 est tout de même beaucoup plus performante !!!

      GPA

  • Kevin

    The source of the traffic is the Raspberry Pi Facebook page…
    https://www.facebook.com/thepizone

  • Nice tutorial, but if you want to get extratime for your pi you need to modify it, replacing the liner 3,3 on board regulator with a switching one, you can easy squeeze more 200mA out of that with this…

    • Thanks. But in this case does it mean that all connected sensors or peripherals on the raspberry pi must accept 5V in input ?

      • Chris,

        Excellent tutorial, and as emuboy pointed out you can easily operate the Pi in 3V3 only, the 5V is used only to power USB devices and even the USB Wifi key work in 3V3.
        So depending on your utility and what you want to put on your USB ports,
        you change the regulator of Pi by a less greedy, more efficient and especially LOW DROP OUT style MCP1825S, You can then feed your PI with 3 batteries only or even by a Lipo to cheap.

  • Arnaud

    Very interesting. Is it possible to make a mount using this and the sector in order to ensure that the sector is used d first then the batteries when the sector is cut?

    • Hello,
      The principle of a UPS would actually top with re-charging the batteries when the sector is used. Malheureusement cela sort de mes compétences 😉 Il y a un projet KickStarter pour ça je crois.

      • Arnaud

        in fact I just found this: http://www.piups.net/
        Someone knows?

        • Yes this is the project I mentioned. A volunteer in the classroom to test ? 🙂

Handpicked links

disk Page Caching using disk: enhanced Database Caching 248/515 queries in 0.333 seconds using disk Served from: pihomeserver.fr @ 2017-08-18 01:26:58 by W3 Total Cache -->