Install radical Raspberry feet to manage your contacts and calendars
Some do not like to have their information accessible by companies like Google, Apple or other. Whether it's for the emails, contacts or calendars, several solutions exist. This article will allow you to host you even part of these information and control access through Radical.

Radical is a solution allowing to store your contacts and calendars to your own system and make them available via the CalDAV protocols, CardDAV and WebDAV. You can manage multiple books or calendars and implement access controls. You can also store your contact cards (vCard), TODO, etc.
The list of tools supported by radical are :
- Mozilla Lightning
- GNOME Evolution
- KDE KOrganizer
- aCal, CalDAV-Sync and CardDAV-Sync for Google Android
- CalDavZAP
- CardDavMATE
- Apple iPhone
- Apple iCal
- syncEvolution
[EDIT] The Nokia GDR2 adds CalDAV and CardDAV support in the Lumia under WP8.
To put this service in place :
- Update the system
apt-get update && apt-get -y upgrade
- Radical is available through PyPi so let's install pip :
apt - get install python-pip
- Start the installation of radical
PIP radical install
- To run the server nothing more simple :
radical
- You can now use your client to connect to the server. If you need to access from the Internet and your local network, then it will need to open port 5232 on your box and surely use a tool to find your machine (see this article).
You will find all instructions according to the customers on this page.
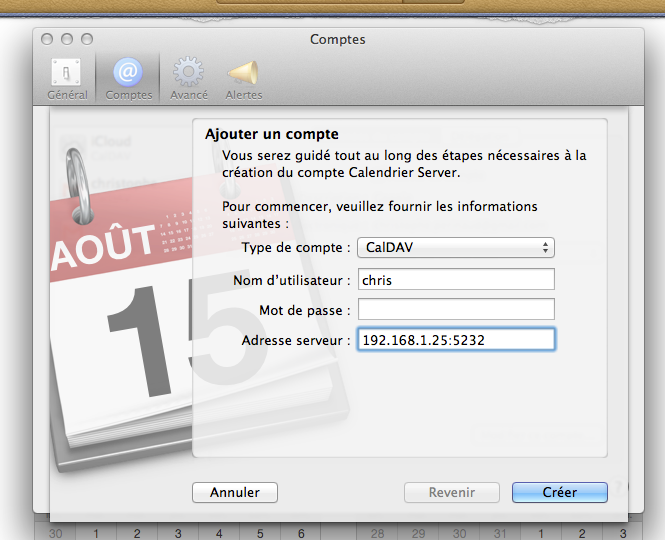
Here is an example for iCal in Mac OS :

 And then here is your account :
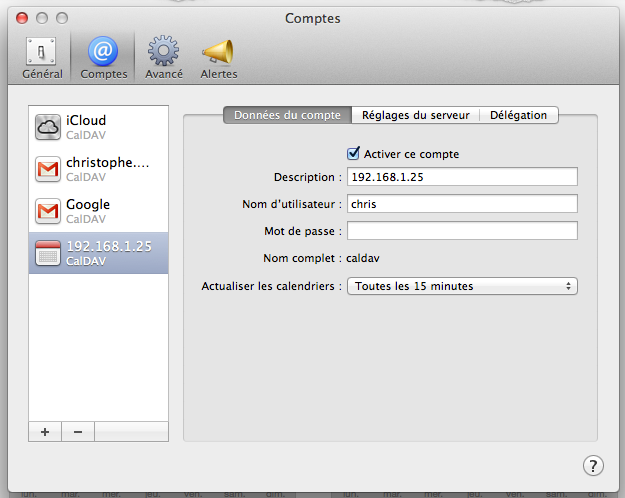 It is for the basic configuration : no password protection, no SSL certificate, etc.
 - To configure more technical and securely, simply create a directory /etc/radical, then create a file config. La configuration par défaut est la suivante :
[server]
# CalDAV server hostnames separated by a comma
# IPv4 syntax: address:port
# IPv6 syntax: [address]:port
# Ipv6 addresses are configured to only allow IPv6 connections hosts = 0.0.0.0:5232
# Daemon flag daemon = False
# File storing the PID in daemon mode pid =
# SSL flag, enable HTTPS protocol ssl = False
# SSL certificate path certificate =/etc/apache2/ssl/server.crt
# SSL private key key =/etc/apache2/ssl/server.key
# Reverse DNS to resolve client address in logs dns_lookup = True
# Root URL of Radicale (starting and ending with a slash)
base_prefix = /
# Message displayed in the client when a password is needed realm = Radicale - Password Required lol
[encoding]
# Encoding for responding requests request = utf-8
# Encoding for storing local collections stock = utf-8
[auth]
# Authentication method
# Value: None | htpasswd | IMAP | LDAP | PAM | courier | http type = None
# Usernames used for public collections, separated by a comma public_users = public
# Usernames used for private collections, separated by a comma private_users = private
# Htpasswd filename htpasswd_filename =/etc/radicale/users
# Htpasswd encryption method
# Value: plain | sha1 | crypt htpasswd_encryption = crypt
# LDAP server URL, with protocol and port ldap_url = ldap://localhost:389/
# LDAP base path ldap_base = ou = users,dc=example,dc=com
# LDAP login attribute ldap_attribute = uid
# LDAP filter string
# placed as X in a query of the form (&(...)X)
# example: (objectCategory=Person)(objectClass=User)(memberOf=cn=calenderusers,ou=users,dc=example,dc=org)
# leave empty if no additional filter is needed ldap_filter =
# LDAP dn for initial login, used if LDAP server does not allow anonymous searches
# Leave empty if searches are anonymous ldap_binddn =
# LDAP password for initial login, used with ldap_binddn ldap_password =
# LDAP scope of the search ldap_scope = OneLevel
# IMAP Configuration imap_hostname = localhost imap_port = 143
imap_ssl = False
# PAM group user should be member of pam_group_membership =
# Path to the Courier Authdaemon socket courier_socket =
# HTTP authentication request URL endpoint http_url =
# POST parameter to use for username http_user_parameter =
# POST parameter to use for password http_password_parameter =
[rights]
# Rights management method
# Value: None | owner_only | owner_write | from_file type = None
# File for rights management from_file file = ~/. config/radicale/rights
[storage]
# Storage backend
# Value: filesystem | database type = filesystem
# Folder for storing local collections, created if not present filesystem_folder = ~/. config/radicale/collections
# Database URL for SQLAlchemy
# dialect driver://user:password@host/dbname[?key=value..]
# For example: sqlite:///var/db/radicale.db, postgresql://user:password@localhost/radicale
# See http://docs.sqlalchemy.org/en/rel_0_8/core/engines.html#sqlalchemy.create_engine database_url =
[logging]
# Logging configuration file
# If no config is given, simple information is printed on the standard output
# For more information about the syntax of the configuration file, see:
# http://docs.python.org/library/logging.config.html config =/etc/radicale/logging
# Set the default logging level to debug debug = False
# Store all environment variables (including those set in the shell)
full_environment = False
# Additional HTTP headers
#[headers]
#Access-Control-Allow-Origin =. *
Through this file you can activate SSL, change the authentication method to enable passwords, etc.
All information and precise explanations are on this page. - To enable identification by password stored in a file, you need to change the line
type = None
by
type = htpasswd
The name of the file which will be stored identifiers is to specified line
htpasswd_filename = / etc/radical/users
You must then install htpasswd with :
apt - get install apache2-utils
To add a user :
htpasswd-c/etc/radicale/users chris New password:
Re-type new password:
Adding password for user chris
The-c option is to use that to add the first user.
- To share your calendar with others, It is in the section rights where you can give the name of a file containing the list of user/calendar couples with behind what user can do what. For example :
# This means user1 may read, User2 may write, user3 has full access.
[user0/calendar]
User1: r user2: w user3: rw
- You can activate SSL and generate your own certificates by following the method of this article.
Ce n’est pas le genre d’outil que je vais utiliser chez moi mais j’espère que ça pourra vous aider dans votre quête de l’indépendance 🙂


